Azure AI Vector Search enhances search capabilities by leveraging vector embeddings to understand the semantic meaning of queries and documents. When integrated with Copilot Studio, it enables natural language interactions with your data, making it a powerful tool for AI-driven applications. This guide walks you through setting up the entire stack, from connecting data sources to enabling advanced search functionality.
Table of Contents
Prerequisites
Before you begin, ensure you have:
Step 1: Setting Up Azure Synapse Link for Dataverse
Azure Synapse Link connects your Dataverse environment to Azure, allowing data to be exported to a storage account for further processing. But firstly, we should deploy the Azure Synapse Analytics service.
1. Create Azure Synapse Analytics Workspace:
In the Azure portal, go to “Create a Resource” and create a Synapse Analytics workspace and set up the following options.


Screenshot 1
Screenshot 1 explained:
- Resource group – a new group can be created from here.
- Managed resource group – a container that holds ancillary resources created by Azure Synapse Analytics for your workspace.
- Workspace name – Synapse Analytics workspace name.
- Region – The region of service deployment should ideally be the same as the region of the dataverse environment. However, other relatively close regions may also be suitable (additional costs for data transfer may apply).
- Account name – storage name for Data Lake Storage, can be created from here.
- File system name – file system name for Data Lake Storage, can be created from here.

Screenshot 2
Screenshot 2 explained:
- Type your SQL Server admin login.
- Choose a SQL Password.
2. Create a New Azure Synapse Link:
- Navigate to Power Apps Portal. Select Azure Synapse Link from the left-hand menu.

- Click “New link” and set the following parameters.
1. The checkbox “Connect to your Azure Synapse Analytics Workspace” should be checked.
2. Subscription – Current Azure subscription.
3. Resource group, workspace name, storage account – parameters basically from previously created Azure Synapse Analytics Workspace.
- Select the tables you want to export. Note: Only tables enabled for change tracking will appear.

- Also, there are advanced options:
1. “Append only” – can be applied to create new copy of data at Azure Synapse Analytics when Dataverse data is modified, instead of rewriting data of records.
2. Partition – by default, Azure Synapse Link for Dataverse partitions data monthly based on the “createdOn” column. For tables without the “createdOn” column, data is partitioned into new files for every 5,000,000 records

Step 2: Configuring Azure AI Search
Azure AI Search indexes and vectorizes your data, making it searchable with advanced capabilities.
1. Create an Azure AI Search Instance:
- In the Azure portal, create a new Azure AI Search resource. Set up the following options.
1. Resource group – the same resource group as a group for Azure Synapse Analytics.
2. Service name for Azure AI Search instance.
3. Location – region of service deployment, ideally should be the same region as Dataverse environment and Azure Synapse Analytics Service. But other relatively close regions should do it (additional cost for transferring data may apply).


- There are several pricing options, as well as scaling options. But for the following example, we chose a free pricing tier with no scale.


2. Import Data:
- Go to the “Import data” section in your Azure AI Search instance.
- Select “Azure Blob Storage” as the data source.
- Specify the storage account and blob container where Synapse Link exports your Dataverse data (e.g., “Data Lake” storage account).
3. Set Parsing Parameters:
- Set “Parsing mode” to “Delimited text” since the data is in CSV format.
- Use a comma (,) as the “Delimiter character.”
- Since Synapse Link CSV files lack headers, manually enter column names matching your Dataverse fields plus any system columns.
Troubleshooting Tip:
- After importing, an index, indexer, and skillset are created automatically (page 16). If the indexer fails, check for CSV import issues and apply workarounds as needed (page 17).
Step 3: Configuring Azure OpenAI Service
Azure OpenAI service is used to provide embedding models for vectorizing data in Azure AI Search. Embedding models enable semantic search by converting text into vector representations.
1. Set Up Azure OpenAI Service:
- Create an Azure OpenAI service instance in the Azure portal. And set up following options.
1. Resource group – the same resource group as group for Azure Synapse Analytics and Azure AI Search.
2. Region – region of service deployment, ideally should be the same region as dataverse environment and Azure Synapse Analytics Service. But other relatively close regions should do it (additional cost for transferring data may apply).


- Deploy the preferred embedding model via the Azure AI Foundry portal. In this case “text-embedding-3-small” model is used.

Step 4: Azure AI Search import and vectorize data
Firstly, we should check which storage/blob container has our data. Though we created “crm120910-filesystem” within Azure Synapse Analytics Workspace, Azure Synapse Link created its own container for Dataverse data. The “2025-07.csv” file is our current Dataverse data has to be parsed and provided to the Azure AI Search service.


1. Import and vectorize data:
In Azure AI Search, open the “Import and vectorize data”. Select “Azure Data Lake Storage” and then “RAG”.


Now, set up the following parameters:
1. Storage account – Data Lake storage name.
2. Blob container – Blob container with our Dataverse data.
3. Parsing mode – “Delimited text”, since data is stored in CSV format.
4. Delimiter character – comma for delimiting CSV data.
5. Delimiter headers – Names of CSV headers, since Azure Synapse Link doesn’t store headers directly, we should provide names for them. It includes all Dataverse fields from the selected table, as well as some system columns.


- Then set up the following parameters.
- Column to vectorize – in the following example product’s “name” field is vectorized and used by Azure AI Search.
- Kind – AI Service used to provide embedding models.
- Azure OpenAI service – Since we are using and creating the Azure OpenAI service.
- Model-deployment – Embedding model from the following AI service. Here we use an embedding model, which we created earlier within Azure OpenAI at the Azure AI Foundry portal.

- Then we can choose which fields to index and set the scheduling parameter. Indexing is used to provide these fields for search results. As we can see, we can’t change previously added products’ “name”, because it’s used as a vectorized field.


2. Troubleshooting indexer problems.
- After importing data, following “Index”, “Indexer”, and “Skillset” are created automatically.

- It is possible that the indexer won’t work on the first try. There are some issues with importing CSV files that can be fixed by some workarounds.


- To fix “chunk_id”/”Could not parse document” errors, we should make sure that the indexer definition has a mapping function, as it is said at the docs.

- So, it is needed to edit JSON inside an indexer and add a mapping function.

,
- After that fix, we should reset and re-run the indexer. It takes some time to index data, depending on the actual volume.

Step 5: Testing Vector Search in Azure AI Search
Verify that your vector search works as expected.
1. Use Search Explorer:
- In Azure AI Search, open the “Search Explorer.”
- Enter a test query to search your indexed data.
2. Analyze Results:
- Results will show items based on semantic similarity (e.g., synonyms).
- Hide vector values using “Query options” for cleaner output.
- Data shown in response.
1. “chunk” is basically a vectorized field. In that case, the product’s “name”
2. “description” is a field from that table that we indexed.
3. Also, the search provides relative scores for search results. Check the relative scores to gauge result relevance.

Step 6: Integrating with Copilot Studio
Copilot Studio enhances the search experience with a natural language interface.
1. Add Azure AI Search to Copilot Studio:
- Firstly, we should add an Azure AI Search connection to the Power Apps portal. The endpoint URL can be found at the Azure AI Search service “Overview” page. Admin key can be found at Azure AI Search Settings -> Keys -> Primary Admin Key

- Then we can add Azure AI Search at Copilot Studio, either as a Knowledge source or as a Tool (prev. Actions). Testing shows that Azure AI Search as a knowledge source strips data in the result response message to the user. Also, using it as a Tool and “Vectorized search vector” connector gives options to set up manually, such as top N searches.

- After adding “Vectorized search vector” as a Tool, we can set up the connection and important inputs.
- Search Text – text that is used as a query for vector search (the same way we tested vector search manually).
- Index Name – Index name that is used for search. Can be found at Azure AI Search service – Indexes.
- Top Searches – top N searches to get as a result of vector search.
- Selected Fields – fields to get as a result of vector search (in that context, these are fields of our parsed Dataverse table in CSV format).“chunk”, as previously mentioned, is a vectorized field; in that case, the product’s name.
- “description” – description field from the table.
- Now we can use this tool either directly (if generative orchestration is turned on) or inside the topics. Also, the response has a “score” for each result.
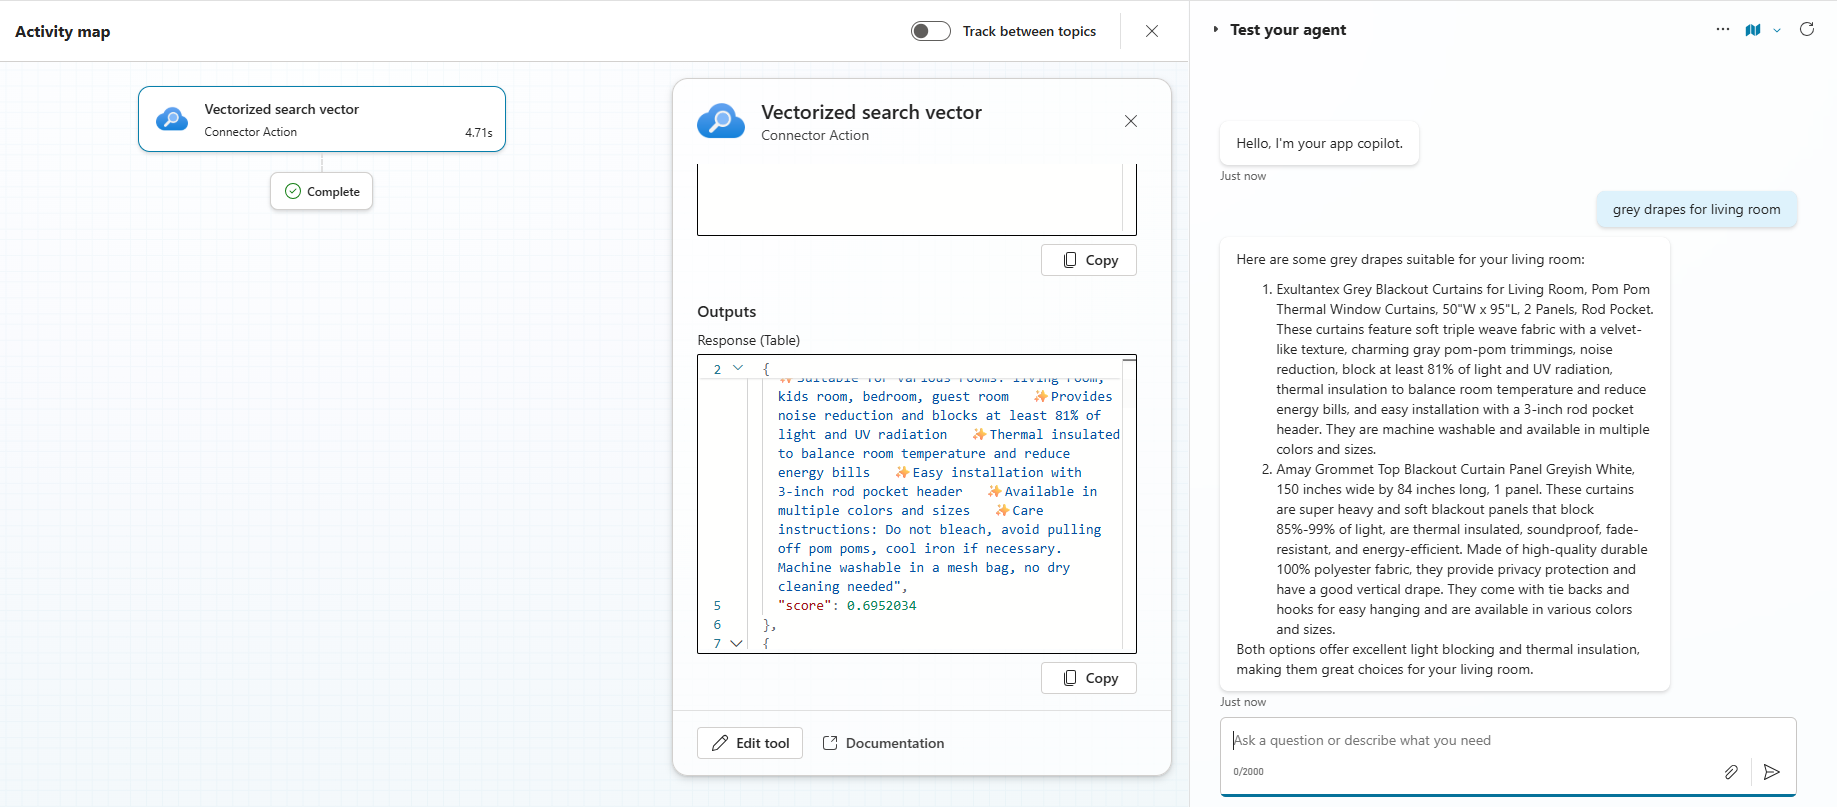
- Importantly to notice, if we use this tool (plugin action) inside the topic, it won’t have outputs to use later in the topic; it just sends a generated message based on vector search response results.


Conclusion
You’ve now set up a robust search solution combining Azure AI Vector Search and Copilot Studio. This stack allows for advanced, context-aware searches that go beyond simple keyword matching. Explore further customizations, such as adjusting search parameters or adding more data sources, to tailor the experience to your needs.

