Business events

Business event is a mechanism that gives you an ability to take actions outside Dynamics 365 Finance and Operations apps in response to a business event that occurs in Finance and Operations. You can find all the information about Business events here.
Additionally, if you are looking for some code samples you can visit this page.

Now we are going to take a look at an example of interaction between business event in Finance and Operations and Azure Service Bus Queue.

Business events and Azure Service Bus

For the security reasons Microsoft recommends storing connection strings outside your applications. Therefore, they provide an Azure Key Vault drive for such purposes.

All you need is to give your application the correct access to the keys, secrets, certificates.

Here is a list of the actions that you must execute to create Azure Service Bus Queue and connect Business event to it:

  • 1. Create a new Service Bus namespace.

  • 2. Create a new Service Bus Queue.

  • 3. Create a new key vault to store the Service Bus key.

  • 4. Register an Azure app that has permission to access the key vault.

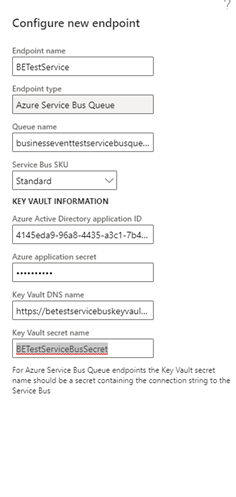
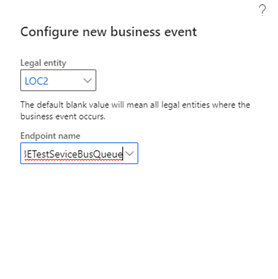
  • 5. Configure a Business Events endpoint.

  • 6. Consume the business event.

Create a new Service Bus namespace

  • 1. Go to the Azure portal.

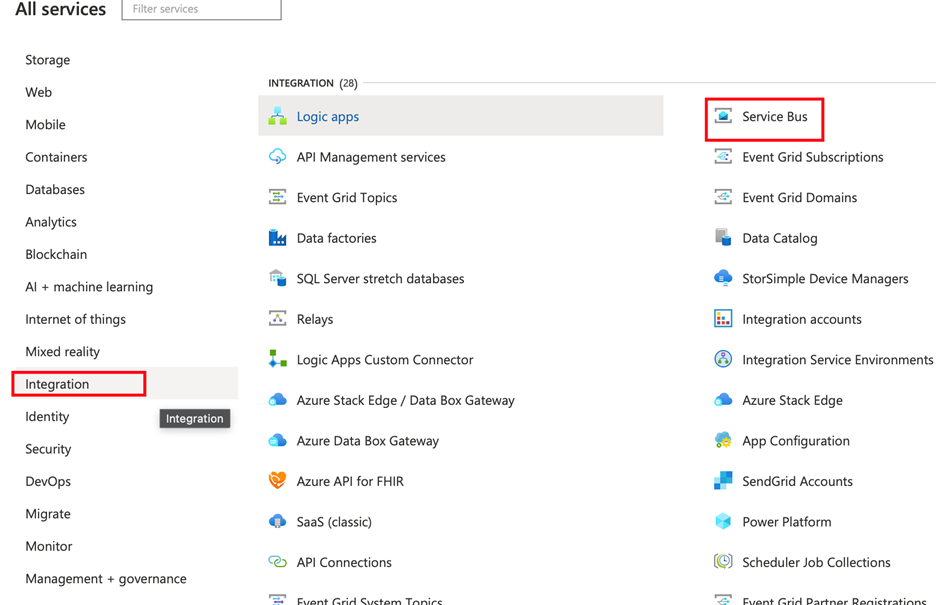
  • 2. Select All services > Integration > Service Bus.

Business_events_Picture1
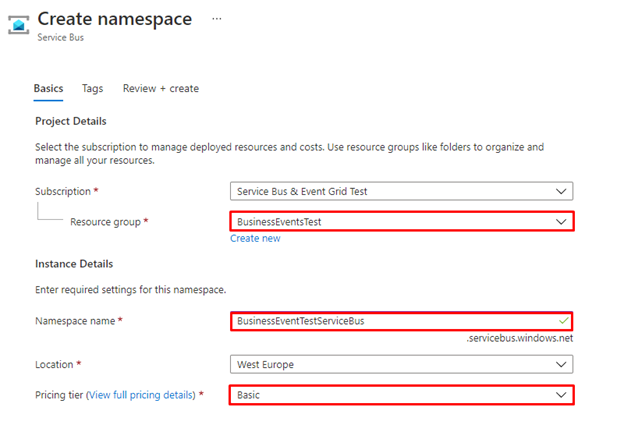
  • 3. Select Add to create a new Service Bus namespace and set the parameters. Select the Standard pricing tier. You can create a new resource group as a container for your lab, or you can use an existing resource group.

NOTE

If you select the Basic pricing tier, you can create only queues. To create topics, you must select the Standard pricing tier.
Business_events_Picture3

Also, you should specify valid and readable Namespace name for your Service Bus.

Then press Review+Create button and wait for the deployment of the resource.

Business_events_Picture5

Create a new Service Bus queue

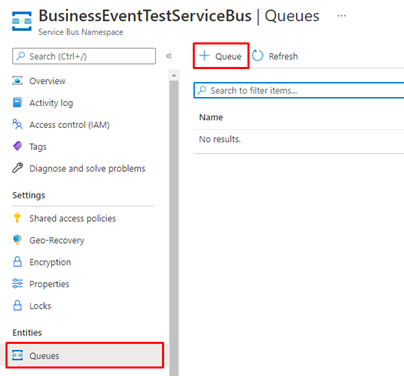
  • 1. In the Azure portal, select the Service Bus that you just created, and then create a new queue.

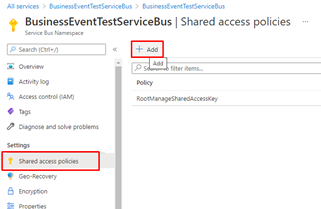
  • 2. Go back to the blade for your Service Bus and create/configure a new shared access policy to send events. Only the Send policy is required to send events to the Service Bus queue.

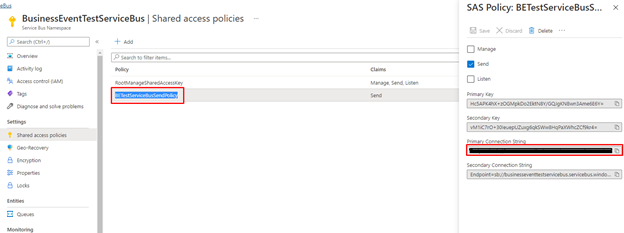
  • 3. Select the new Send policy, and then copy and save the Primary Connection String value. You will use this value later.

Business_events_Picture9

Enhance your project delivery with OntargIT partner services

We are not a recruitment organization that just hires and resell resources. Instead we are service-oriented partner focusing on long term collaboration with customers and development of our teams. We obtain expertise which we’ve got by providing implementation consulting  to end customers for many years, and great team synergy we’ve built by doing so.

Create a new key vault

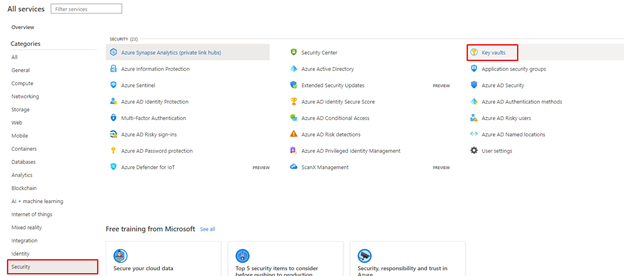
  • 1. In the Azure portal, select All services > Security > Key vaults.

Business_events_Picture10
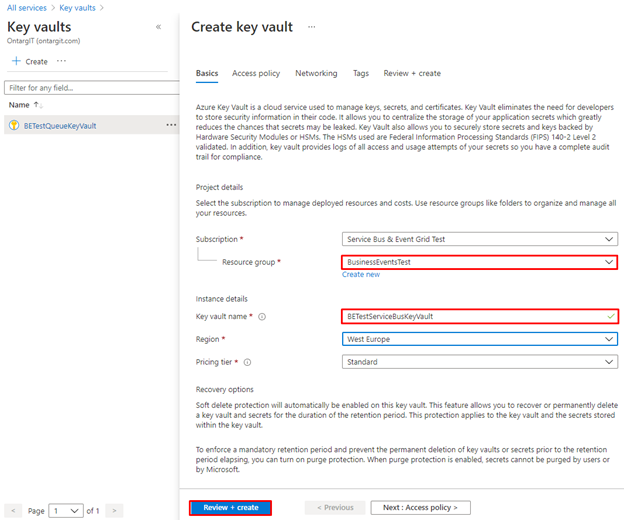
  • 2. Create a new key vault in your resource group and set the default parameters. Click review + create. Wait till resource is deployed.

  • 3. Select Overview, then copy and save the Vault URI value for the key vault. You will use this value later.

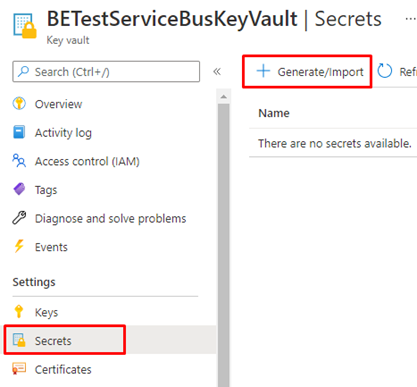
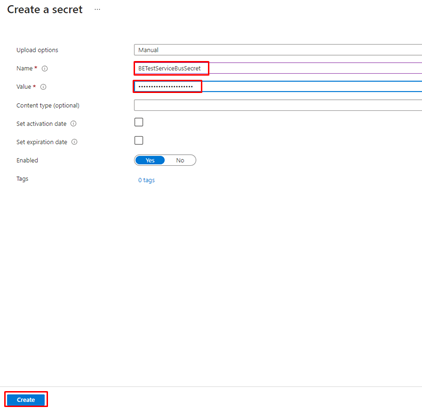
  • 4. Select BETestServiceBusKeyVault > Secrets > Generate/Import. Enter a name for your secret and paste the Service Bus connection string that you saved earlier.

  • 5. Select Create.

Business_events_Picture14

Register a new application

In this procedure, you will register a new application with Azure AD, and give it read and retrieve access to key vault secrets. Finance and Operations will then use this application to retrieve Service Bus secrets.
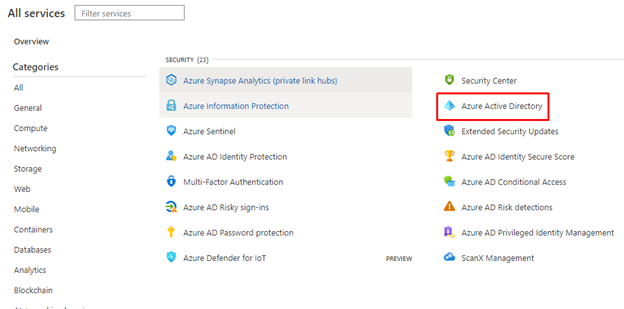
  • 1. In the Azure portal, select All services > Security > Azure Active Directory.

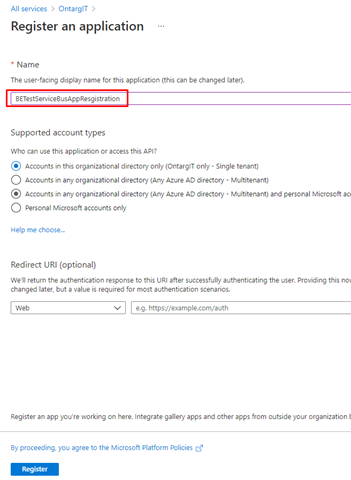
  • 2. Select App registrations (preview) > New registration, and enter a name for your application. Select Register.

Business_events_Picture16
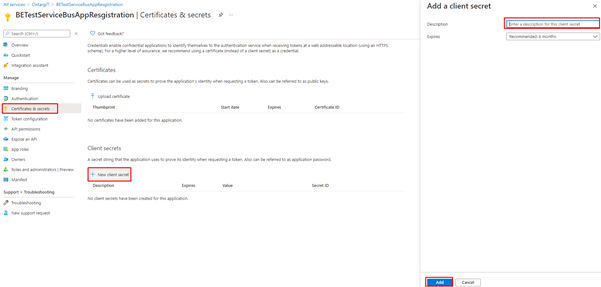
  • 3. Select the new application, and then select Certificates & secrets > New client secret. Enter a name for your secret and set the secret so that it never expires. Then select Add.

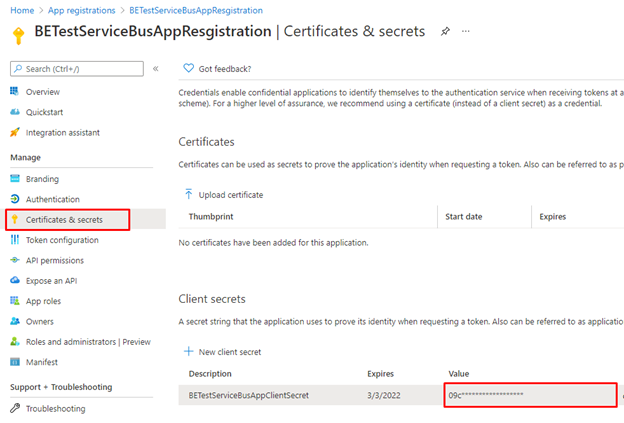
  • 4. Copy and save your new secret. You will use it later.

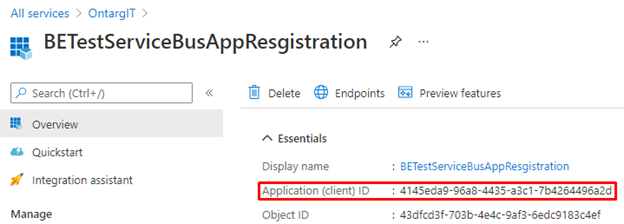
  • 5. Select Overview, and copy and save the application ID. You will use this value later.

Business_events_Picture19
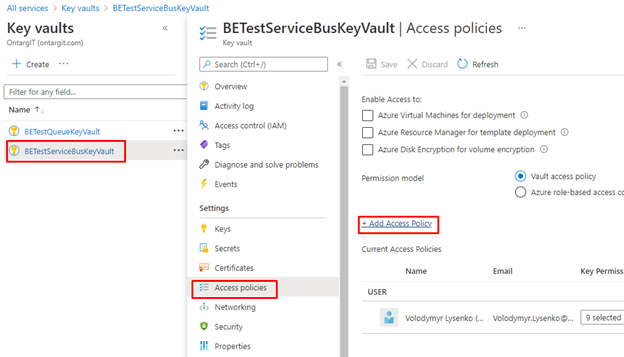
  • 6. Select All services > Security > Key vaults.

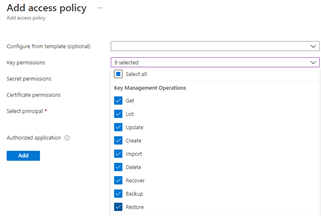
  • 7. Select the key vault that you created earlier, and then select Access policies > Add new.

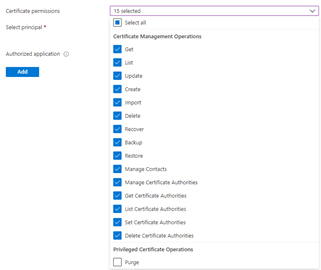
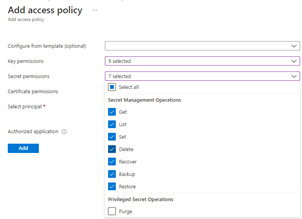
  • 8. On the Principal blade, select your new registered application. Select the check all boxes for the Key management operations, Secret management operations and Certificate permissions.

Business_events_Picture22
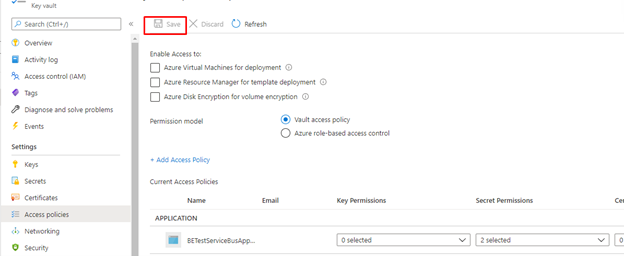
  • 9. Save your new access policy.

Business_events_Picture24

Configure a Business Events endpoint

  • 1. Sign in to the application and go to System administration > Setup > Business events.

  • 2. Select Endpoints.

  • 3. Select New.

  • 4. Select Azure Service Bus Queue.

  • 5. Select Next.

  • 6. Set the required parameter values.

Business_events_Picture26

Consume a business event

In the current scenario we will just call send method for the business event directly from runnable class:
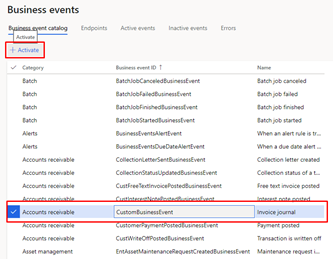
  • 1. Select the business event catalog and look for Invoice journal business event.

  • 2. Activate the business event for USMF company.

Business_events_Picture27

After you activate a business event that uses the new Service Bus endpoint, the application sends a test message to verify that the configuration is accurate and to cache the connection.
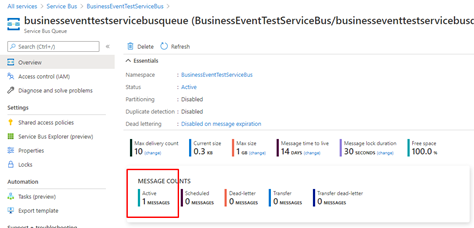
  • 3. To verify that the test message has been received, in the Azure portal, select your created queue, and check for a message in it. Verify that the message count for the queue shows a value of at least 1. If it doesn’t, wait for the batch job to pick up your message.

Business_events_Picture29
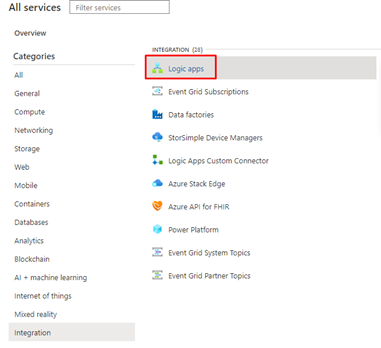
  • 4. Select All services > Integration > Logic Apps.

Business_events_Picture30
  • 5. Create a new logic app in your resource group.

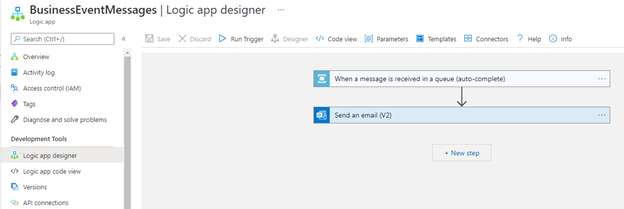
  • 6. After your Logic Apps resource has been created, select the option to create a blank logic app.
  • 7. Search for Service Bus and select it.

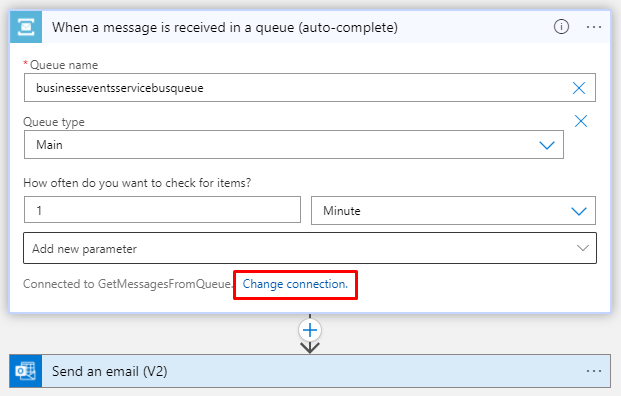
  • 8. Select the trigger that is named When a message is received in a queue (auto complete).

Business_events_Picture31

If you want to change connection for a different Service Bus queue, click Change Connection.
Business_events_Picture32
  • 9. Select New step to add a new action.

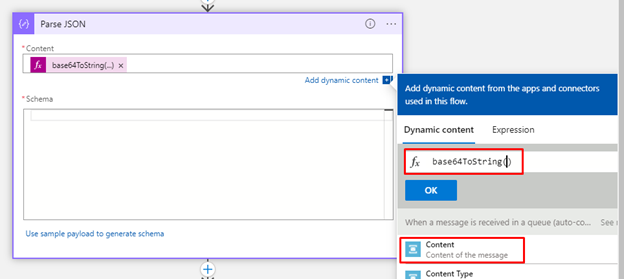
  • 10. Search for the Parse Json data operation. This step is required so that the message can be parsed by using the schema of the data contract.

    The body content that is received from the Service Bus is encoded into base64 format. Therefore, you must transform it to string format before the JavaScript Object Notation (JSON) payload can be parsed.

  • 11. Click in the Content field, and then, in the pane that appears, on the Expression tab, enter the following expression: Base64ToString()

Next, you must enter the schema of the contract that is received from the application. The application only provides a sample payload. However, you can use a capability of Azure Logic Apps to generate a schema from a payload.

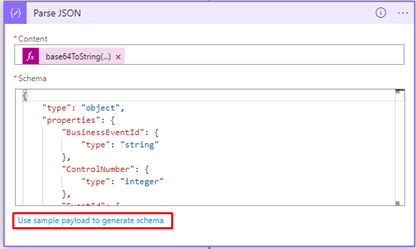
  • 12. Select your event in the business event catalog, and then select the Download schema link. Open the text file that is downloaded and copy the contents.

Business_events_Picture34
Business_events_Picture35
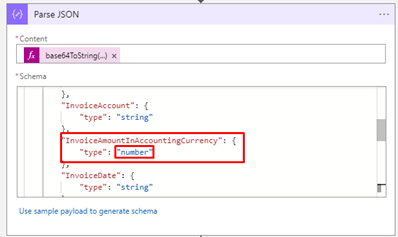
  • 13. Depending on the quality of your sample payload, your generator won’t be able to distinguish between an integer and a real value, especially if the real value is provided as a whole number in the sample payload. Review the schema that is generated and determine whether you must change a field of the integer data type to the number data type. (In JSON, the number data type represents real values.)

Business_events_Picture36
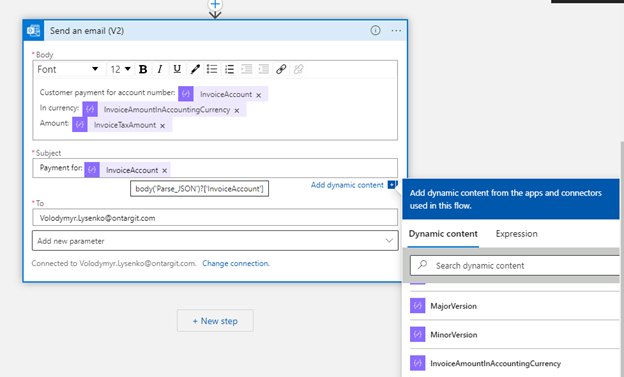
  • 14. Search for the send email action, and then sign in to your Microsoft 365 account.

  • 15. Fill in the message with the required fields.

Business_events_Picture37
  • 16. Save your logic app.

  • 17. Trigger the business event by calling send method from code. Then verify that the logic app runs, and that you receive an email that includes customer payment details.

Copy to Clipboard

Article was prepared by:

Volodymyr
VolodymyrLysenko
Software Developer, OntargIT
Published On: / Categories: Tech article, Azure, ERP /

Upgrade your business strength with Dynamics 365

OntargIT is an official Microsoft partner for the implementation of Dynamics 365 technologies. With our experience in various industries, we will provide an individualized approach and effective solutions that will perfectly meet the needs of your company. Leave a request now, and our team of experts will help you take advantage of all the benefits of Dynamics 365.

By submitting my data, I agree to be contacted